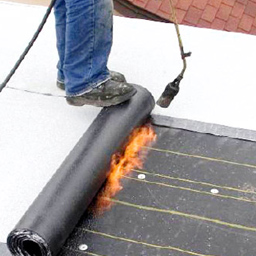
How To Install Torch Down Roofing On A Patio

Can I Use Aluminum Or Plastic Sheeting Between Decking And Joists To Waterproof Under A Deck Deck Design Deck Framing Timber Deck

Torch Down Techniques And Details Application Video Youtube

Torch Down Roofing Installation Gaf Cool Roof System Youtube

Torch Down Roofing My Way Youtube

Torch Down Rubber Roof Over New And Existing Roofs Youtube

Torch Down Roofing Step By Step Instructional Video Check This Out Youtube
Install a corrugated roofing wall connector panel to a wall with roofing sealant when installing panels for a patio cover.
How to install torch down roofing on a patio. Be sure the larger edge is laid so that the small edge of the next panel will overlap it. Tutorial on the proper torch application techniques. Install the roofing screws vertically along each rib in the panel. This helps in setting up the lap of the panels.
Subscribe and share. Installing the torch down roofing involves flames and melted asphalt. When the two layers are pressed together they form a seal. Also cover up with long sleeved clothing to reduce the chances of an accident.
If installing a three layer torch down roof the contractor will install a third layer with a granulated surface in the same way. This video shows you how to use a torch and also tar to make a repair on a modified bitumen rubber flat roof. Make sure you offset yo. Tutorial on the proper torch application techniques.
After applying the rolled roofing the process is almost complete. Lay the panels on the ground the way you want them to be on the roof. If installing a two layer torch down roof this is the final layer of rolled roofing material the contractor will apply. In a two layer torch down roof the system is complete at this point.
This will help you get started and you will also learn some tricks. Follow manufacturer s instructions for the sealant application. This is a long video but it will show you how to do it. Watch this video if you want to learn how to use a propane torch on a flat roof.
Choose heat resistant gloves and boots made of a material like kevlar. And tie it into your hip roof. Hope you like it. You will need to use your gloves and boots on occasion to roll or press down on the bitumen sheets as they bubble.
Align the first metal roofing panel so that it overlaps the edging by 1 2 to 3 4 of an inch and is square to the roof line. If not a third layer with granules is applied in the same way.

Guide To Torch Down Roofing Materials Components Pros Cons Iko

Diy Roof Maintenance Checklist 6 Shingles Roof Inspection Repair Correct Installation Roof Maintenance Roofing Maintenance Checklist

What Is Epdm Epdm Roofing Association Epdm Roofing Commercial Roofing Roof Restoration

Flat Roof System Installed Flat Roof Systems Flat Roof Roof Design

Pin Of The Day Novato Job In Progress Flat Roof Has Been Re Sloped With Fiber Board Then Installed With A Black Mod Flat Roof Residential Roofing Luxury Design

Internal Server Error Tubular Skylights Skylight Skylight Covering

This Garage Roof In Bury Was Completely Transformed When We Installed A Grp Roofing System A Long Time Hardwearin Roofing Options Flat Roof Design Garage Roof
Torch Applied Roofing Roof Pro Does Not Recomend This Roof Install

Flat Roofing Is A Really Common Roof Type And Is Increasingly Popular With Commercial Properties Roofing Felt Is Farmhouse Glass Roof Architecture Diy Roofing

Residential Roofing In Raleigh Removed A Layer Of Shingles That Were Improperly Installed On A 1 12 Pitch And I Porch Roof Residential Flat Roof Roof Coating

Pin By Goodfriend Roofing On Commercial Roofers Roofing Contractors In Tampa Fl In 2020 Commercial Roofing Roofing Contractors Roof Installation

Adding Layer Of Torch Down Roof Onto Old Torch Down Roofing Siding Diy Home Improvement Diychatroom

Torch Applied Modified Bitumen Overview Application Excellence Youtube

Gutter Roof Solutions Nw Before After Photo Set Torch Down Roofing Replacement Tpo Install Burien Washington

Residential Roof Repair Company Tampa Fl Roof Repair Residential Roofing Roofing

Pin On Commercial Roofers Roofing Contractors In Tampa Fl

10 Adventurous Clever Ideas Roofing Terrace Balcony Roofing Materials Types Of Roofing Tiles Ceilings Roofing Shing Roof Repair Roof Repair Diy Rv Roof Repair

Get The Best Torch On Roofing In Canada Dulai Roofing Ltd In Canada Reveals Main Benefits Of Torch On Roofing Giv Roofing How To Install Gutters Best Torch
1

4 نکته در مورد بهترین زمان نصب ایزوگام Roofing Systems Flat Roof Federal Way

Flat Roof Leak Flat Roof Leaking Flat Roof Roof Drain

Epdm Roofing Epdm Roofing Leaking Flat Roof Flat Roof

Article Edmonton Roof Repair Roof Repair Roof Drain Emergency Roof Repair

How To Install Metal Roof Transition Trim For Union S Masterrib Panel Metal Roof Diy Metal Roof Metal Roofing Contractors

Diy Roof Maintenance Checklist 6 Shingles Roof Inspection Repair Correct Installation Roof Maintenance Roof Shingles Shingling

What Exterior Paint Color Works With A Red Tile Roof House Exterior Exterior Paint

Installing New Metal Edging On A Commercial Flat Roof By Www Liroofrepair Com Roofing And Roof Repairs Long I Flat Roof Repair Commercial Flat Roof Roof Repair

Quality Commercial Roofing Company In Tampa You Can Always Trust Roof Installation Roofing Commercial Roofing

Torch Down Roofing Guide Materials Installation Benefits And Disadvantages

Pin By Wave Deaver On Decks Deck Rooftop Deck Flat Roof

Pin On Home

Here At Goodfriend Roofing We Have A Team Of Experienced Roofers Who Offer A Range Of Roofing Services To Domestic And Com Roofer Roofing Services Roof Repair

U Shaped Building With Unique Roof Design On Campus Roof Design Architecture Roof Architecture

Flat Roof Leak Repair Paint On Liquid Waterproof Sealant Roof Leak Repair Leaking Flat Roof Flat Roof Repair

Heritage Home With New Roof The Roof Assured By Sarnafil Single Ply Membrane Flatt Roof Solution Has A 40 Years Li Flat Roof Extension Roofing House Extensions

Before Sarnafil Membrane Installed Single Ply Roofing Roofing Systems Weatherproofing

Flat Roof In Dedham Flat Roof Roofing Dedham

App Classic Roofing 100sq Torch Down

South Coast Roofing Company Has Many Types Of Flat Roof Solutions Such As Epdm Rubber Grp Liquid Waterproofing From Your Epdm Roofing Roofing Flat Roof

Services We Offer 80011 Roofer 80011 Roofing 80011 Roof Repair 80011 Roof Installers 80011 Roof Installation 8 Roof Leak Repair Roof Repair Roof Installation

Pin By Benny On Besylve Garage Roof Patio Pictures Patio In 2020 Garage Roof Patio Pictures Patio

How To Build An Under Deck Roof Under Deck Roofing Building A Deck Under Decks

