How To Make A Cone Roof In Sketchup

Sketchup Drawing A Cone Point And Flat Youtube

How To Draw A Tiny House With Google Sketchup Part 4 Tiny House Google Sketchup Earthship

Sketchup Frustum1 With Images Sample Board Autocad Create

How To Draw A 3d Printable Heart Shape In Sketchup Heart Printable Heart Shapes Shapes

Sketchup Basics015 How To Make A Cone Youtube

Easily Create Roof In Sketchup Youtube
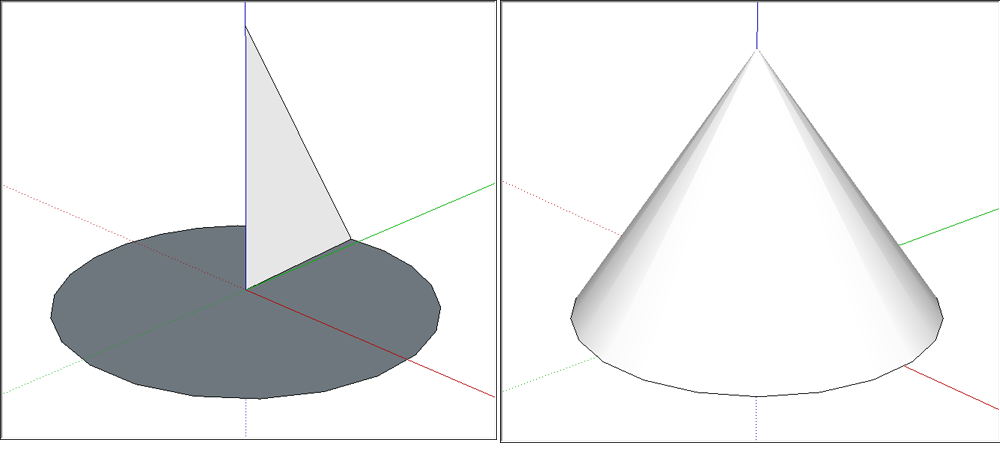
With the circle tool draw a circle.
How to make a cone roof in sketchup. Draw a line from center to the edge and from the center upward. Use the push pull tool to extrude the circle into a cylinder. You just achieve a cone. A cardinal point is aligned.
A pivotal part of the cone. It should form a triangle. Click on the path roof surface to select then click on the follow me tool and then click on the profile triangle roof piece. Watch this tutorial to find out how to make a basic roof in google sketchup the easy to use 3d modelling tool.
This video shows you step by step with narration in the simplest way how you can make a dome or a hemisphere in sketchup. This will determine the height of the cone draw a line connecting the top of the standing line and the edge of the circle. Make a cone this sketchup tutorial is about how to make a cone in 3 different ways check it out. Geek this links website.
This tutorial will teach you how to draw a 3d cone in sketchup. To create a cone from a cylinder follow these steps. If you did it right you will see some funky structures on your roof. Click a cardinal point on the top edge of the cylinder as shown on the left in the figure.
This will create the roof over the structure to include the eaves.

3d Modeling With Sketchup Make Trimble Layout Architecture Budget Interior Design Google Sketchup

When You Import Textures In Google Sketchup You Will Have Three Options Use As Image Use As Texture Enterier Design Sketch Up Architecture Woodworking Plans

1001bit Tools Freeware Freeware Tools Family House Plans

Curved Bench Modeling In Sketchup Youtube Curved Bench Curve Bench

Google Sketchup 2 Versions Of Turrets And Towers Google Sketchup Turret Version

Pin On Google Sketchup

9 Ways To Create Presentations From Your Sketchup Models The Sketchup Essentials 57 The Sketchup Essentials Sketchup Model Presentation Model

2459 Automatic Assemblies In Profile Builder 3 For Sketchup With Auto Assemble Youtube Builder Automatic Sketchup Model

8 Secret Functions Of The Sketchup Joint Push Pull Extension Woodworking School Learn Woodworking Woodworking Shop Layout

Pin On Archicad Tutorial

Showing Multiple Furniture Options In Sketchup Interior Design Tutorial The Sketchup Essentials Design Architectural Section Architecture Presentation Board

Smart Models In Sketchup With Plusspec The Bim Extension Sketchup Plugin Of The Week 43 The Sketchup Essentials Smart Building Bim Plugins

How To Clad A Dome Turret Or Radius Detail With Metal Fine Metal Roof Tech Copper Roof Metal Roof Metal Shingles

Editing And Simplifying Curves In Sketchup With Curvizard The Sketchup Essentials Curves Edit Tutorial
Modeling Specific Shapes Objects And Building Features In 3d Sketchup Help

Learn To Use The Advanced Functions Of The Extension Curviloft To Create Organic Models In Sketchup In This Tutor Tutorial Woodworking School Learn Woodworking

5th Grade Sketchup Clemens Online Training Elementary School Students Elementary Schools Resource Classroom

5 Ways To Create Spiral Stairs In Sketchup The Sketchup Essentials Spiral Stairs Woodworking Tutorials Stairs
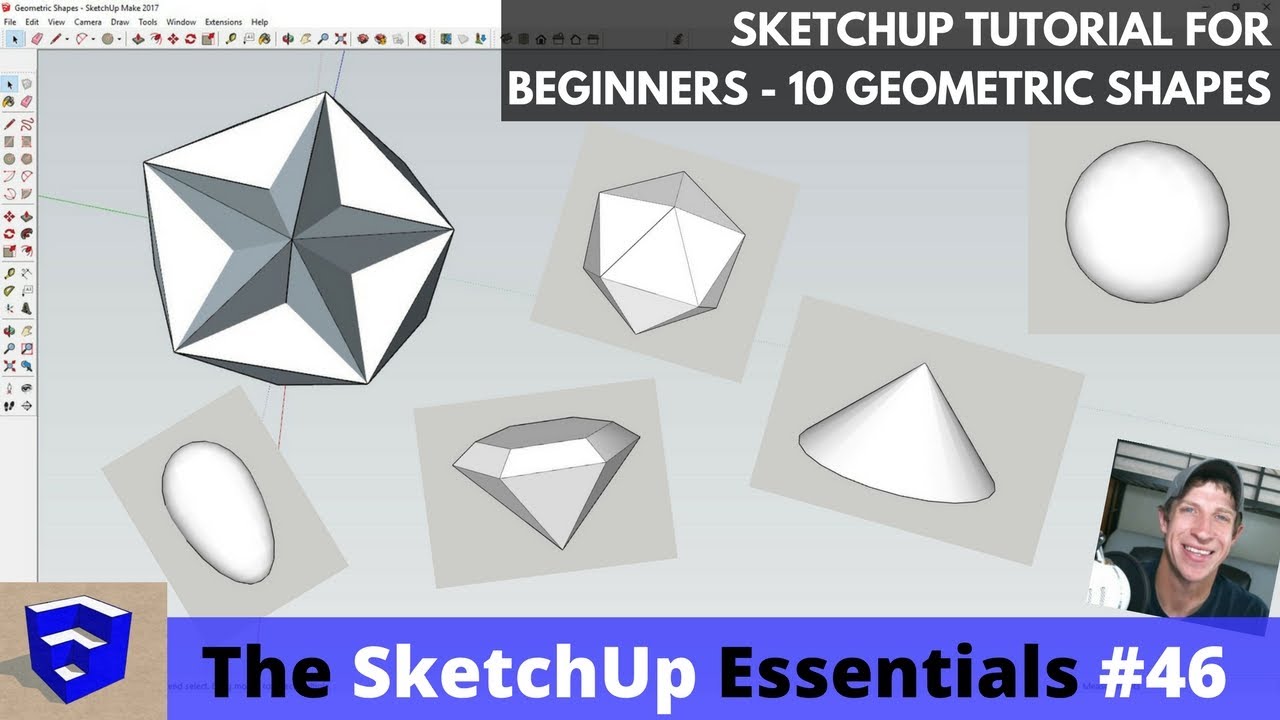
Modeling 10 Types Of Geometric Shapes In Sketchup The Sketchup Essentials 46 Youtube

How To Develop A Truncated Cone Metal Fabrication Sheet Metal Fabrication Interesting Drawings

Contemporary Vernacular The Shifting Definitions Bali Architecture Vernacular Architecture Architecture

Sketchup House Modeling Idea From Photo 8x10m Desain Rumah Modern Denah Desain Rumah Desain Rumah

Sketchup Build A Semi Circular Ramp Youtube Circular Surfboard Ramp

Sketchup Pro 8 Modelling A Bolt And Nut In 2020 Bolt Nut Bolt Model

1505 Gates Sketchup Model Free Download Sketchup Model Sketchup Free Free Download

Large Preview Of 3d Model Of Table B B Italia B B Italia Sketchup Model Ceiling Lights

V Ray Spotlight Parameters Cone Angle 0 2 Lamp Novelty Lamp Lava Lamp

Gallery Of Membran Structures Type Ev 11 In 2020 Type Gallery Structures

Pine Cone Mini Cabin Or Tiny House Under 200 Square Feet Cabin Loft Tiny House Plans Tiny Cottage

Nice Elevation Tropical House Design Bali Architecture Outdoor Sitting Area

Free Model 3d Ceiling Light File Sketchup Ceiling Lights Sketchup Model Coffee Shop Design

A Littli Big In 2020 Diagram Architecture Architecture Presentation Architecture Panel


Sketchup 2013 Tutorial Applying Materials Lynda Com Applied Materials Tutorial How To Apply

Official Sketchup Blog Dome Structure Geodesic Dome Homes Geodesic Dome

Carredesignstudio On Instagram Loved Producing This Design And Rendering For The Sketchup For Interior Designers Competiti With Images Interior Designers Interior Design

Pin On Beds

Triangulated Space Frame Space Frame Space Truss Truss Structure


Vray 3 5 For 3ds Max 3ds Max Digital Artists 3ds

Suitcase Vacuum Former 3d Warehouse In 2020 Vacuums Shop Plans Plexus Products

Le Corbusier Assembly Hall Roof Chandigarh India 1964 Architecture Model Architecture Le Corbusier

