How To Remove Row Of Siding

Strip Of Wood Nailed To Lower Edge Of Wall To Kick Out Bottom Of First Siding Row Siding Repair Fiber Cement Siding Hardboard Siding

Tips On Removing Vinyl Siding For Attaching Ledger Board Vinyl Siding Removing Vinyl Siding Vinyl Siding Cost

How To Remove Siding Without Tools Youtube

How To Replace Damaged Wood Lap Siding In 2020 Huis

How To Safely Remove Asbestos Siding Asbestos Siding Siding Removal Siding

How To Remove And Replace A Section Of Vinyl Siding Fine Homebuilding

Start by lifting an overlapped piece of vinyl on the top row.
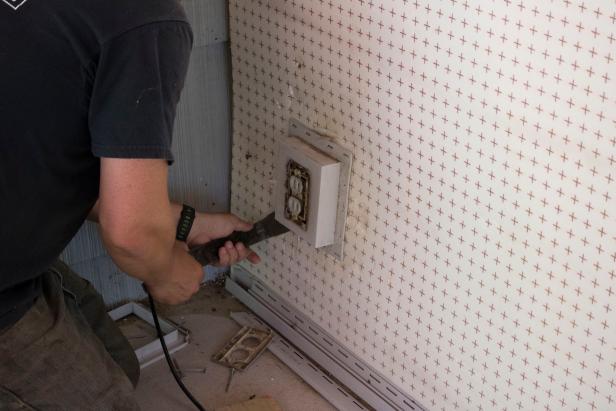
How to remove row of siding. Cutting the nails will let you remove rotted boards without damaging those your e saving. The channels around windows and the bottom of the wall secure the edges and bottom row into position. To remove a piece at your eye level slide the zip tool under the piece above that one. Slide the separating tool underneath the bottom edge of the siding piece that is directly above the piece.
Here are the basic steps. Isolate the piece of siding you need to remove and find its outermost edge on either side. Cut the nails at the bottom of the row above the boards you re replacing. Insert the siding removal tool where the panels overlap and pull down and out.
You should be able to slide it horizontally and remove it from the channel to expose the nails from the second row down. Use a cat s paw or other small pry bar to pull the nails from the course you need to remove. Reveal the nails anchoring a piece to the wall by sticking the zip tool under the bottom of the piece above it. Zip tools disconnect a higher piece from a lower piece.
Use a zip tool to disconnect two pieces of siding. Pull the piece of vinyl siding. Look for a horizontal seam between two courses of vinyl siding. Use a small hacksaw with a sharp blade.

Cleaning Siding Mold And Mildew Removal With A Power Wash Service Call Us For A Free Quote 571 505 8868 Or Go T Clean Siding Mildew Remover Mold And Mildew

F Vinyl Siding Trim Google Search Siding Trim Vinyl Siding Trim Vinyl Siding Accessories

How To Remove Old Paint From Refinish And Restore Wood Clapboard Siding Homesteady Vinyl Siding Wood Siding Exterior Clapboard Siding

The Great Unveiling Removing Vinyl Siding Oldhouseguy Blog

How To Remove Vinyl Siding 11 Steps With Pictures Wikihow

How To Remove Asbestos Siding Youtube Asbestos Siding Siding Removal Siding Paint

Apparently We Have Cedar Shingles Under Our Vinyl Siding In About This Color Who Knew Now To Convince Michael Vinyl Siding House House Siding Cedar Siding

Pin On Diy Outdoor Projects

Pin On Work

How To Fix Loose Vinyl Siding Vinyl Siding Siding Repair Vinyl Siding Maintenance

Board And Batten Siding Board And Batten Siding Board And Batten Exterior

View Our Different Vinyl Siding Trim And Accessories And Discover How You Can Dramatically Transform Your Home S Ext Siding Trim Vinyl Siding Vinyl Siding Trim

How To Flash Dormers When Replacing A Roof Without Replacing The Siding Fine Homebuilding

Pin By Scott Phetteplace On Vertical Siding Vertical Siding Fiber Cement Siding Cement Siding
How To Safely Remove Vinyl Siding Hgtv

Craftsman Style Home Custom Built By C Balducci Builders Inc The Home Features Sage Ranch House Exterior Exterior Paint Colors For House House Paint Exterior

Vinyl Siding Design Ideas Pictures Remodel And Decor Mansard Roof House Roof Roof Architecture

Corner Pro Clip On Vinyl Siding Corners 5 5 In X 5 5 In X 120 In White Outside Corner Posts 1600010 The Home Depot Vinyl Siding Vinyl Siding Repair Siding Repair
1

Today Was Demoday Number One For Our House They Got Quite A Bit Of The Siding Removed But Still Working On The Foam Boar Termite Damage Siding Foam Board

Home Exterior Lap Siding Installation Remove Orange Peel Texture Removing Textured Walls Orange Peel Wall Texture

Serendipity Refined Blog Tutorial German Schmear Lime Putty Stucco Red Brick Ranch Makeover French Country Decorating Exterior Brick French Country Style

I Love This Combination Of White Stucco And Cedar Shake On This Beautiful Home What S Your Favorit White Stucco House House Paint Exterior Craftsman House

Exterior Color Sherwin Williams Grizzle Gray Sw 7068 Door Color Sherwin Williams Rai Gray House Exterior Grey Exterior House Colors House Paint Exterior

Cottage Style Homes At Heritage Harbor Town Country Living In 2020 Cottage Style Homes Cottage Style Dream Beach Houses

Go Home By Go Logic Options Residential House House Exterior House Styles

Exterior Paint Colors Exterior Paint Colors For House Exterior Paint Colors White Exterior Paint

It Is Official We Are The Winner Of 2018 Angie S List Super Service Award With 400 Reviews 4th Year On Row Great Service Awards Clean Dryer Vent Angies List
Gorgeous Cedar Shake Siding Technique Chicago Traditional Exterior Remodeling Ideas With Cape Cod St House Designs Exterior House Exterior Pergola Plans Design

31 Scary Houses Turned Into Spectacular Homes Scary Houses House Colors Old Houses

Board And Batten Siding For A Unique Exterior Of The House Contemporary Front Doors Front Door Design House Exterior

42 Ideas Home Studio Ideas Garage House Cladding Window Trim House Exterior

Photo 2 Of 11 In An Inviting South African Cottage Embraces Its With Images Facade House House Paint Exterior

Pin By Annie Muller On Exterior Paint House Paint Exterior

How To Shingle A Shed With 3 Tab And Architectural Shingles Installing Roof Shingles Architectural Shingles Installing Shingles

Natural Stone Siding Cost Vs Stucco And Brick Veneer Siding 2020 Brick Veneer Siding House Siding House Siding Options

Another Way To Deal With Extended Windows House Exterior House Design Stone Wall Design

House And Granny Smith Apple Green Door House Paint Exterior House Exterior Exterior Paint Colors For House

House Front Steps Columns 36 Ideas For 2019 House Paint Color Combination Exterior Paint Colors For House Exterior House Paint Color Combinations

This Barn In Loveland Is Being Prepped For A New Roof We Have Installed The First Row Of Underlayment Along The Residential Roofing Roofing Contractors Roof

Shiplap Vertical Exterior Siding Vertical Siding Exterior Cottage Exterior Vertical House Siding

35 Beautiful Navy Blue And White Ideas For Home Exterior Color Freshouz Com Exterior House Colors House Colors House Exterior

