How To Make Sloping Roof In Sketchup
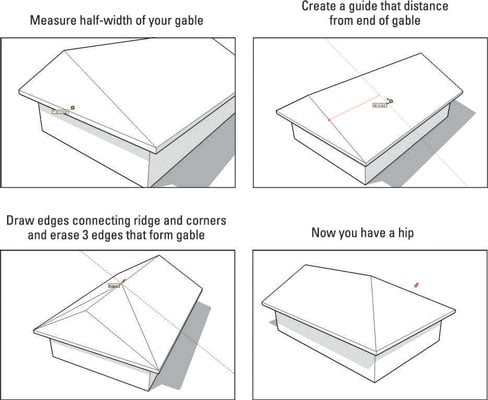
How To Construct Hip Roofs In Sketchup Dummies

Easily Create Roof In Sketchup Youtube

Sketchup Roof Tutorial Youtube

Modeling 9 Different Types Of Roofs In Sketchup Sketchup Quick Tutorials Youtube
How To Build A Gabled Roof In Google Sketchup 8 Dummies

How To Make A Skillion Sloping Roof In Sketchup Using Plusspec Youtube
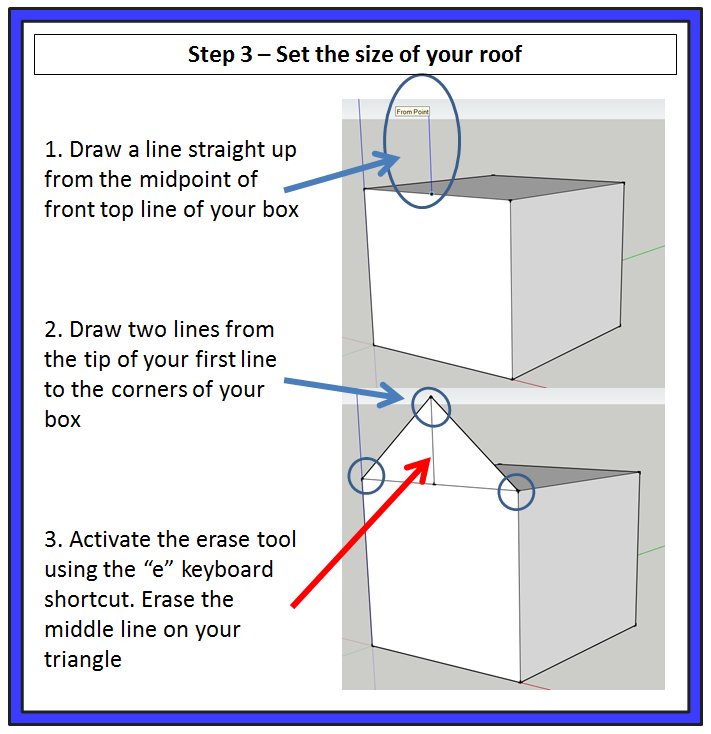
The point at which your edge and your guide meet is the height of your roof ridge.
How to make sloping roof in sketchup. Draw two edges from the top of your vertical line to the corners of your roof. Easily creates roofs with various parameters in sketchup plugin name. Use the line tool to draw a vertical edge from the midpoint of your roof to the angled guide you created in step 2. Push pull back your triangular gable.
Its easy in sketchup to create a sloped roof over a rectangular floor but creating a slope that is at an arbitrary angle or creating a slope over a more complex floor shape can be tougher. If you did it right you will see some funky structures on your roof. Click on the end point of where you want it to be. Click on the path roof surface to select then click on the follow me tool and then click on the profile triangle roof piece.
Draw in the direction that you want your terrain to be. This will create the roof over the structure to include the eaves. Select the icon second from left start from scratch and click on your starting point and drag to the ending point. Use the line tool to draw a vertical edge from the midpoint of your roof to the angled guide you created in step 2.
This sketchup tutorial is show you how to make realistif roof check it out. Draw two edges from the top of your vertical line to the corners of your roof. This creates two triangular faces. Erase the vertical edge you drew in step 3 and the guide you drew in step 2.
In this screenshot you will see very light green points on the green axis.
Instant Roof Plugin For Sketchup Presented By Nextwave Technology Youtube

Realistic Hip Roof With Sketchup Youtube

Easy Roofs In Sketchup With Autofold Youtube

How To Make A Roof In Sketchup 15 Youtube

How To Create Pitched Roof In Sketchup With Os Unmet Hours

4 Drawing A Basic House Google Sketchup The Missing Manual Book

Google Sketchup Five Point Roof Drawing Polygons Youtube

Extension Inspection Instant Roof Sketchup Blog
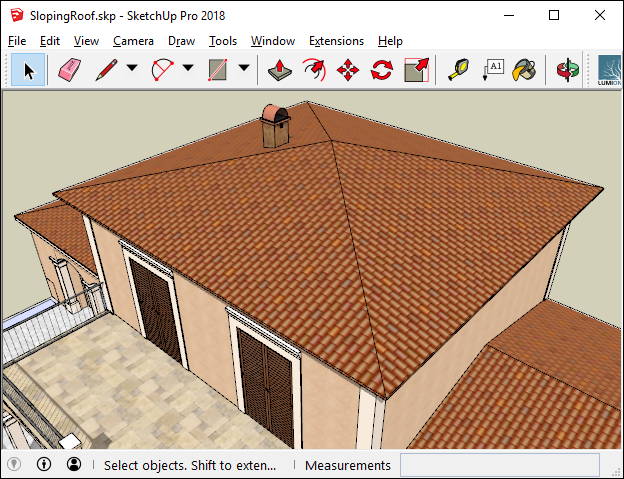
How Do You Get Roof Tile Directions Aligned To The Slope Of The Roof Lumion

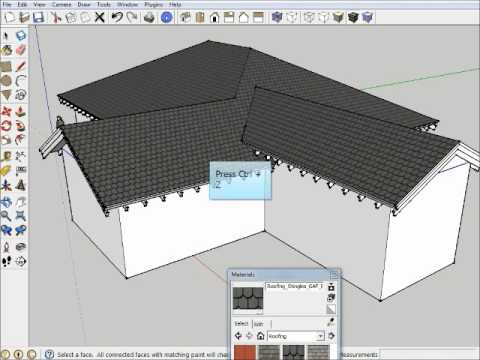
Instant Roof Tutorials The Sketchup Essentials

Sketchup Tutorial Realistic Roof Youtube

Sketchup 5 Creating Walls For A Skillion Roof Youtube
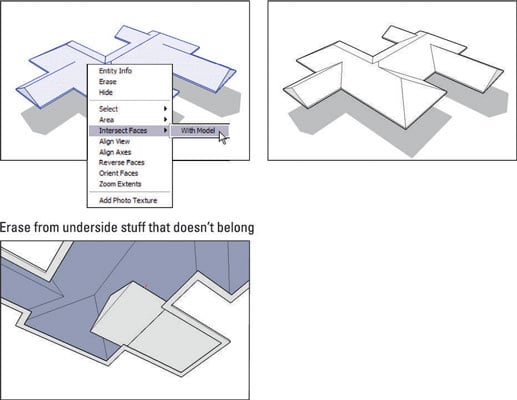
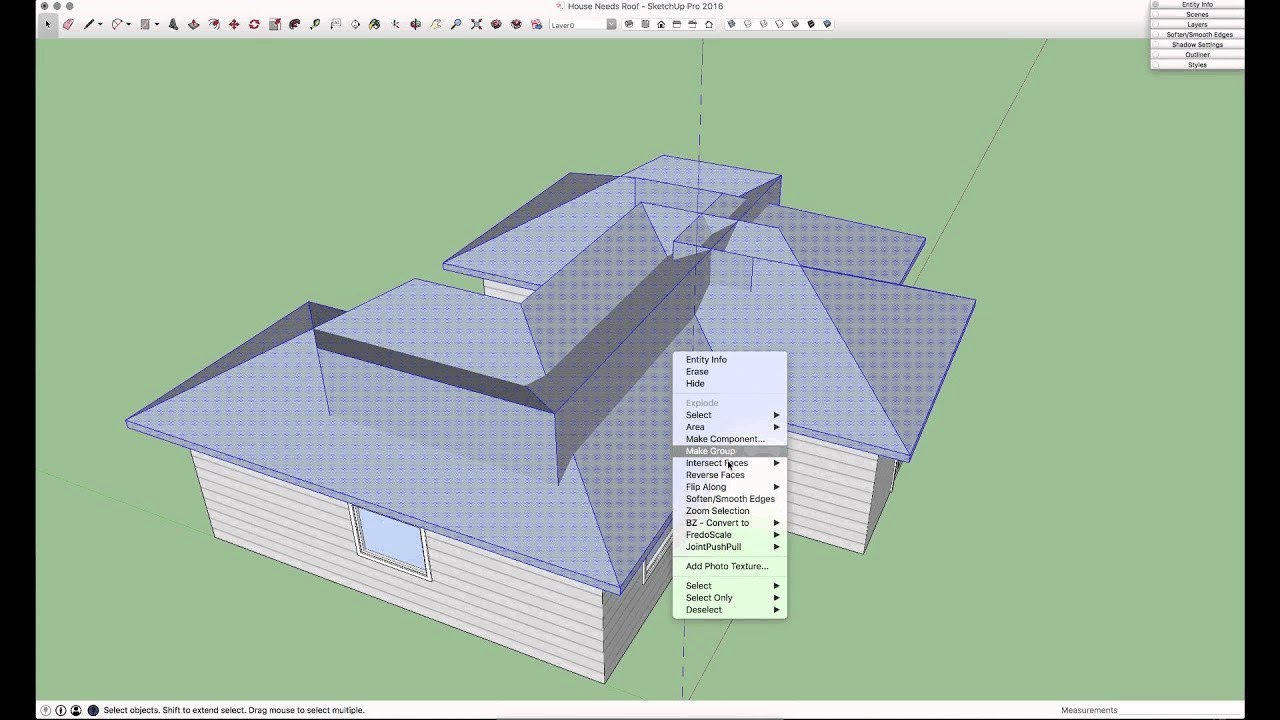
How To Use Intersect Faces To Make Roofs In Sketchup Dummies
Sloped Roof 3d Warehouse

Sketchup Adding A Sloped Ceiling Youtube

How To Make Sloped Curves In Sketchup For A Race Track Mario Kart Wii Custom Track Youtube

Sketchup Roof Pitch Tutorial How To Draw A Roof Youtube
Going 3d Drawing A Doghouse In Sketchup The Sketchup Essentials
Https Encrypted Tbn0 Gstatic Com Images Q Tbn 3aand9gcquzdikyiis0i3pfilplqol4h65scip Rcbzpu4frk Usqp Cau

Roof Of Irregular Plan Sketchucation 1
Modern House With Pitched Roof 3d Warehouse

How To Create 3d Roof In Autocad For Begginers Hip Roof Youtube
Sketchup Skill Builder Hip Roof Youtube

Sketchup Dormer Window Tutorial Youtube

How To Use The Rotate Tool In Sketchup 9 Steps With Pictures

5 Dog House Creating The Roof With Sketchup Youtube

Sketchup Extensions For Architecture Roof By Tig Easy Free Roof Creation Youtube

Revit Tutorials Roofs Youtube

Adding Dormer Window To A Sloping Roof Youtube

Constructability Modeling With Sketchup Roof Modeling Youtube
Medeek Truss Extensions Sketchup Community
Circular Roof 3d Warehouse

How To Create A Window Component In Sketchup 12 Steps

How To Pitch 2 Roofs Into 1 With Plusspec For Sketchup Youtube

Dutch Gable Rafter Roof Easy Steps Awesome Results Tutorial 3d Modeling Rhino Youtube

12 Captivating Slate Roofing Ideas Roofing Construction In 2019 Hip Roof Pergola With Roof Roof Architecture

Sketchup 2019 For Layout Part 6 Adding Exterior Cladding And Roof Youtube
Chinese Roof 3d Warehouse
Roof Sketchup Design For Android Apk Download

Tuto Gratuit Sketchup Amenager Des Combles 2 Youtube
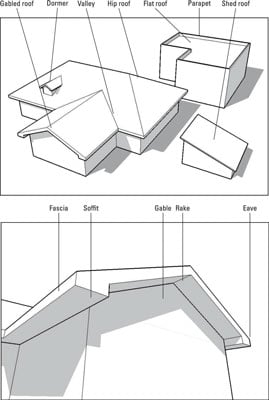
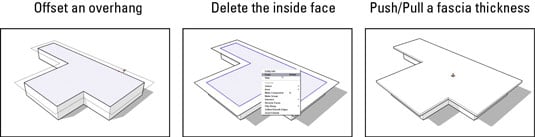
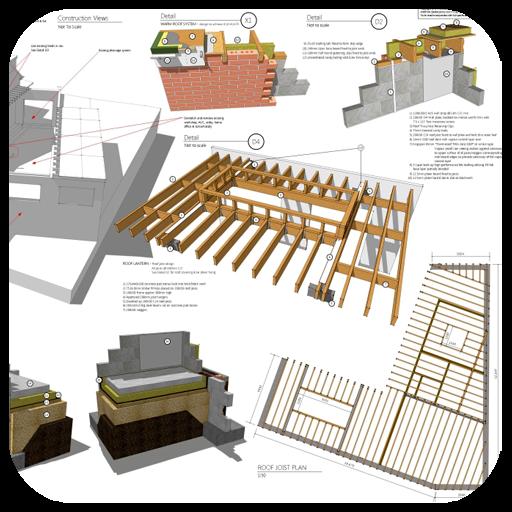
Roof Vocabulary You Might Need When Building Sketchup Models Dummies

Beautiful Parallel Chord Truss Design For Warehouses Design In Framebuilder Mrd For Sketchup Gable Roof Design Steel Trusses Roof Trusses

